
How to Connect Dialnexa’s MCP Server to Claude, ChatGPT, or Your Own Code
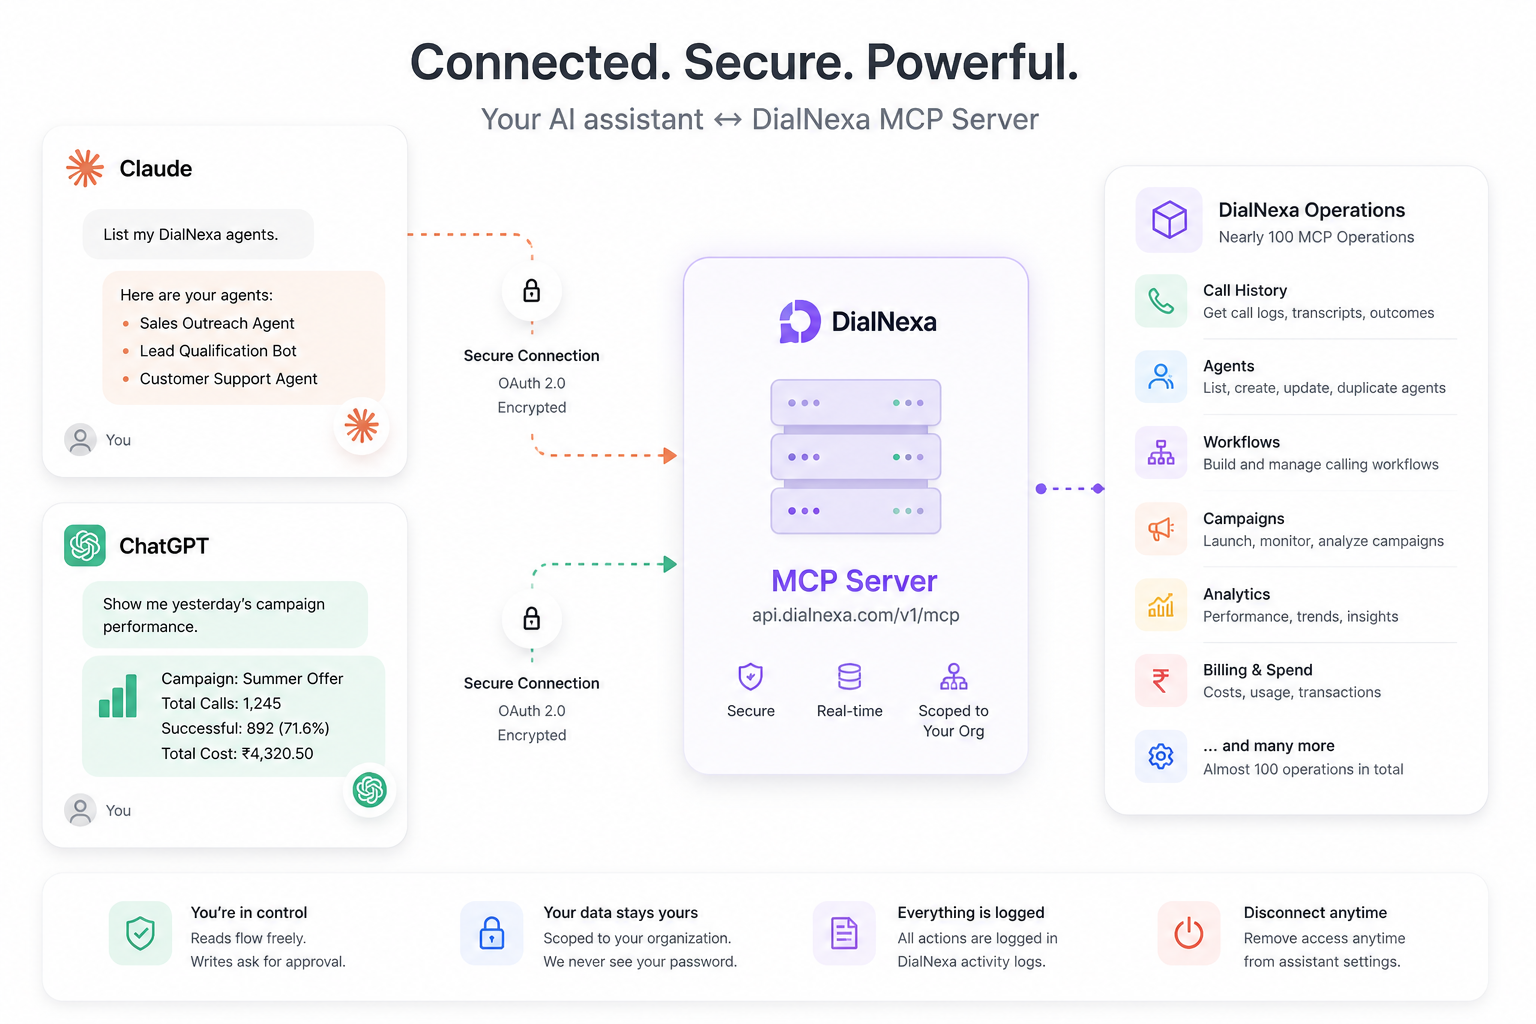
In Part 1 we made the case for asking instead of clicking: nearly a hundred Dialnexa operations that Claude or ChatGPT can now handle for you in plain language. This part is the practical half. By the end of it you’ll have Dialnexa connected to Claude or ChatGPT, you’ll know exactly what every permission screen you clicked through actually meant, and if you’re a developer, you’ll know how to call the same server from your own code with an API key.
None of this requires installing anything. The connection is a hosted one: your assistant talks to our server over the same protocol it uses for every other connector, and you approve the access once through a normal login.
Here’s what you need before starting. A Dialnexa account, on any plan. For Claude, any plan works, including the free one. ChatGPT has custom connectors too, behind a setting called developer mode. OpenAI officially lists this for paid plans, though we’ve seen it appear on some free accounts as well, so it’s worth checking your settings either way. If you don’t see the option, that’s your account, not something you did wrong, and a paid plan is the sure way to have it today.
Connecting from Claude
Claude calls these custom connectors, and the whole flow takes about two minutes.
- Open Claude at claude.ai, and click your profile menu, then Settings.
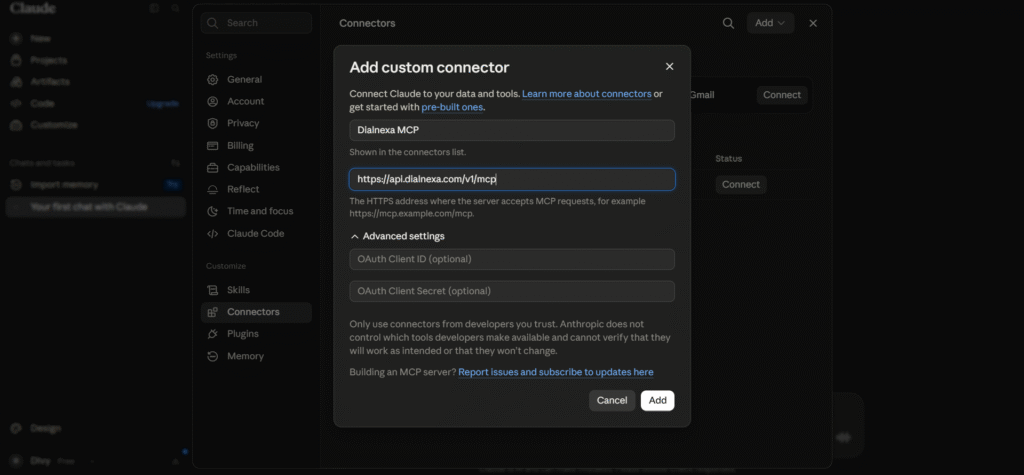
- Find the Connectors section and click Add custom connector.
- Give it a name, Dialnexa works fine, and paste the server URL:
https://api.dialnexa.com/v1/mcp - Click Add, then Connect.
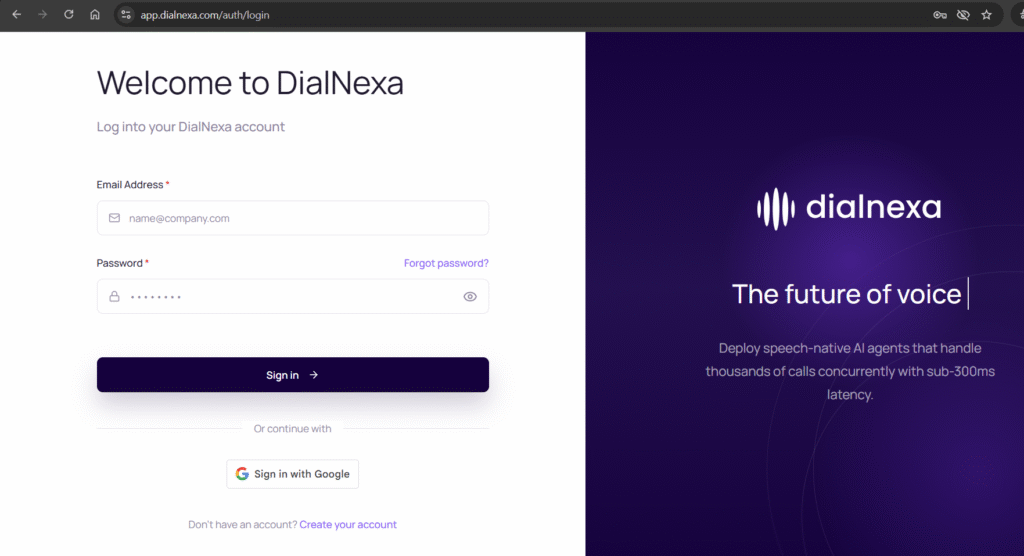
Here’s where the interesting part happens. Claude opens a Dialnexa login page. Notice the address bar: you’re on our domain, not Claude’s. Claude never sees your password. You log in exactly the way you do for the dashboard.
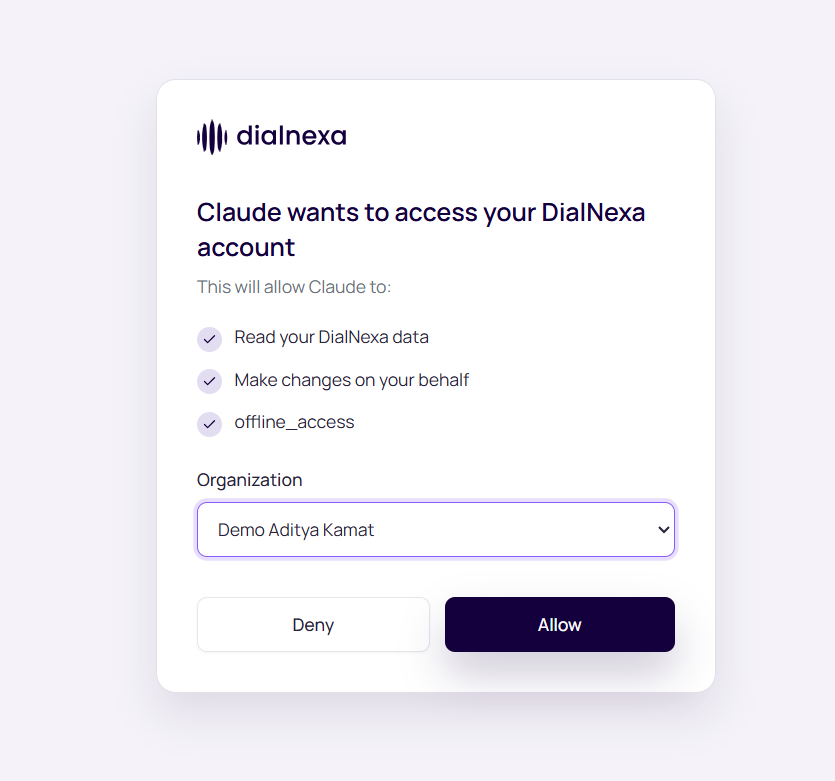
If your account belongs to more than one organization, you’ll be asked which one to connect. Pick the workspace you want the assistant working in. Everything the assistant does from this point on stays inside that organization.
Then comes the consent screen: Dialnexa asking you, in plain terms, whether Claude should be allowed to access your account. Click Allow, and you land back in Claude, connected.
Try it immediately. Type: “List my Dialnexa agents.” If you get your real agents back, everything works.
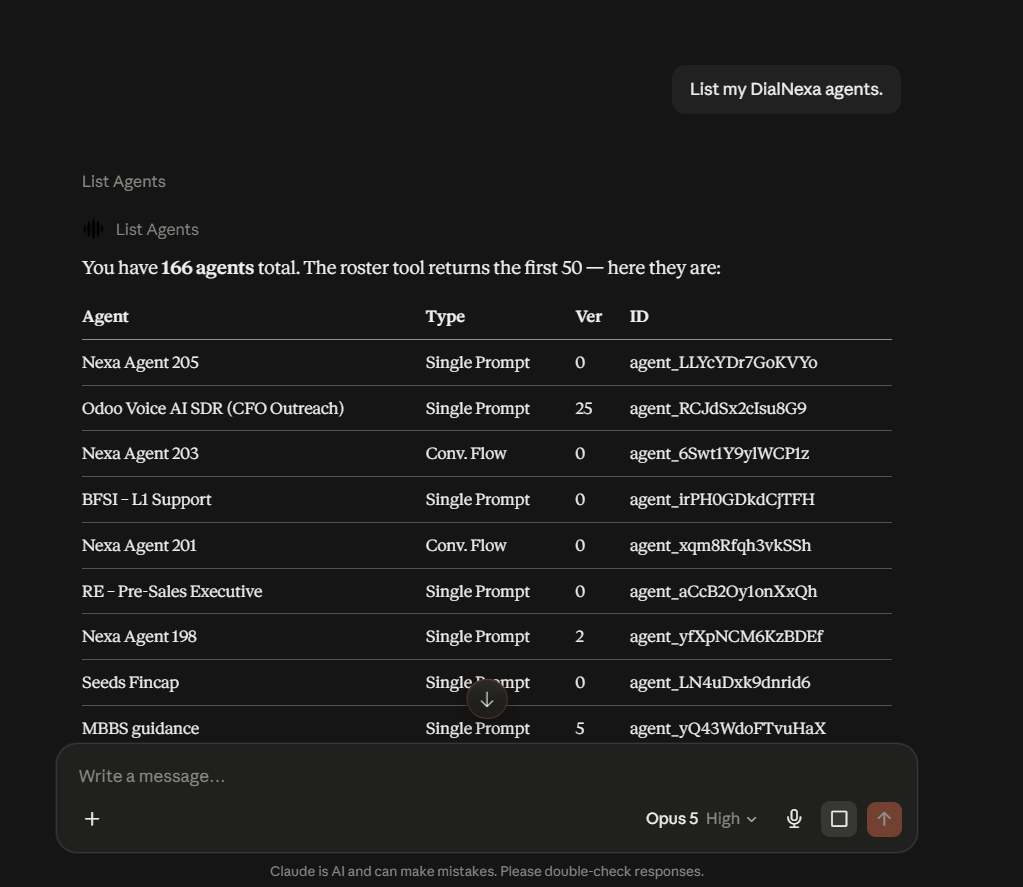
One detail worth knowing: in the connector’s settings, Claude sorts our tools into read-only tools and write tools, and you control when each group needs your approval. The defaults are sensible, reads flow freely and writes ask first, but it’s your dial to turn.
Connecting from ChatGPT
ChatGPT keeps custom connectors behind a setting called developer mode, which sounds more intimidating than it is. It’s one toggle.
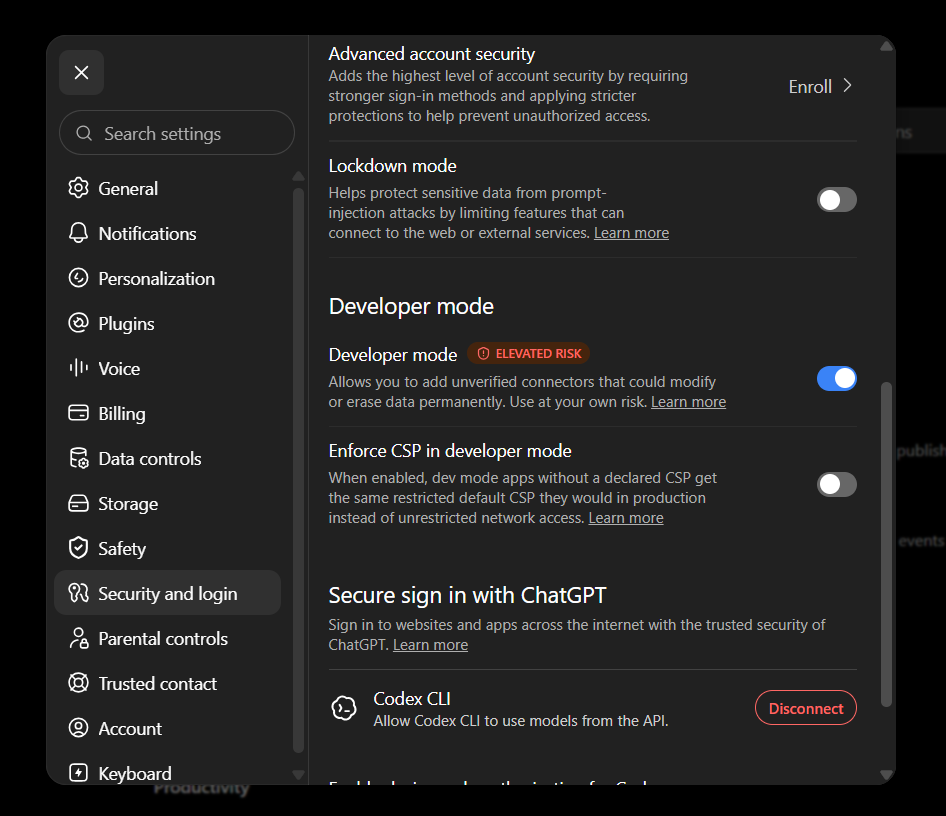
- Open ChatGPT settings and find the Developer mode toggle. Depending on your account it sits under the Plugins section or under Security. Turn it on; ChatGPT will warn you about unverified connectors, which is standard for anything not yet in their directory.
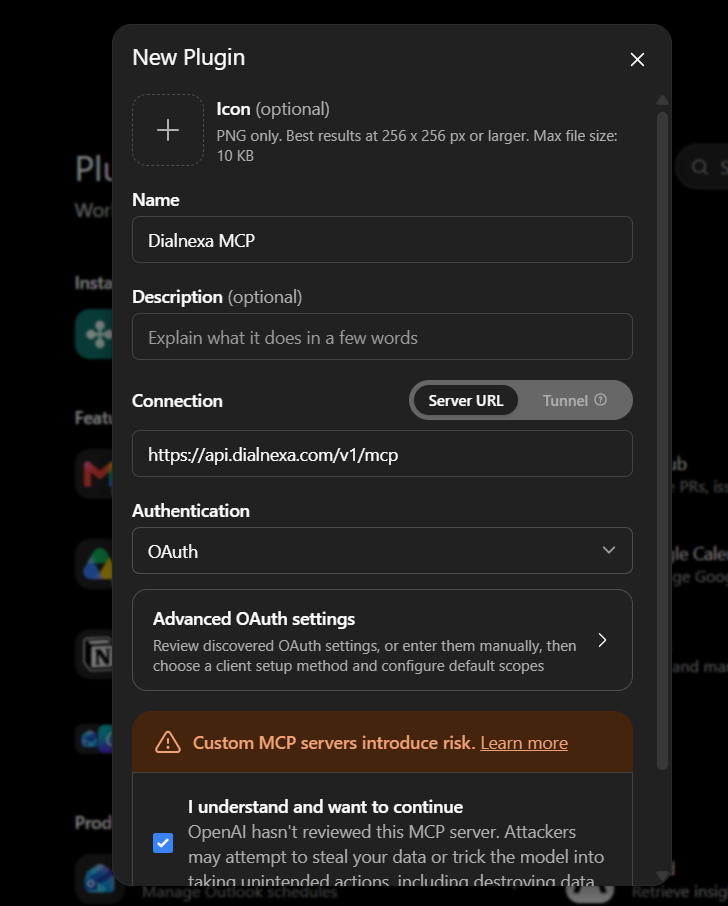
- Create a new connector. Give it a name and paste the same server URL:
https://api.dialnexa.com/v1/mcp - Leave authentication set to OAuth. ChatGPT reads our server’s published configuration and fills in the technical fields on its own.
- Accept the risk acknowledgement and save.
From here the flow is identical to Claude’s: Dialnexa login page, organization choice if you have more than one, consent screen, done. Ask it to list your agents and you’re in business.
What you just agreed to, in plain language
We built this connection on OAuth, the same authorization standard behind Sign in with Google and every bank integration you’ve ever approved. It’s worth thirty seconds to understand what that means in practice, because it’s the answer to the question every operations lead should ask: what exactly can this assistant touch?
Your password stays with us. The assistant receives a token, a scoped credential that says this specific app may act for this specific user inside this specific organization. It can’t reach other organizations on your account unless you connect them separately. It can’t change your password or your billing details, because those operations simply aren’t part of what the token unlocks.
Every action the assistant takes is logged the same way your own dashboard activity is. If you ever want the connection gone, disconnect it from the assistant’s settings, and the access ends there.
And inside the conversation, the assistant asks before doing anything consequential. Reading your call history happens silently. Placing a call, launching a batch, deleting an agent, those surface as an approval prompt you have to accept. You stay the decision maker; the assistant does the legwork.
Five prompts to start with
The connection is only as useful as the questions you ask it. These five cover the daily essentials and each one exercises a different part of the surface:
“How did my calls go yesterday? Anything unusual?”
“List my agents and tell me which ones are published.”
“What’s my wallet balance and this week’s spend?”
“Duplicate my best agent, rename it for testing, and publish it.”
“Call my number with the test agent so I can hear it.”
By the fifth one you’ll have built, published, and heard a live agent without opening the dashboard once.
For developers: the API key route
Everything above uses OAuth because assistants have a human in the loop to log in and consent. Scripts don’t. If you’re wiring Dialnexa into your own automation, backend, or agent framework, the same MCP server accepts your Dialnexa API key instead.
Create a key in the Dialnexa dashboard: open Workspace Settings, then the Developer tab. The key appears once at creation as a single string with a colon in the middle; copy it right then, because it won’t be shown again. Treat it like a password: it carries your organization’s full API access.
The complete tool reference, every operation with its inputs and behavior, lives in our MCP docs. Keep that open in a tab; the examples below show the mechanics.
The server uses Streamable HTTP, the current standard MCP transport. If your MCP client asks you to choose a transport type, pick Streamable HTTP (some clients just call it HTTP); the older SSE option is not what this server speaks. That’s also why the Accept header in the examples below lists both application/json and text/event-stream: the spec lets responses come back either way, and clients declare upfront that they can handle both.
Under the transport it’s standard JSON-RPC. Listing every available tool is one request:
curl -X POST https://api.dialnexa.com/v1/mcp \
  -H "Authorization: Bearer YOUR_API_KEY" \
  -H "Content-Type: application/json" \
  -H "Accept: application/json, text/event-stream" \
  -d '{"jsonrpc":"2.0","id":1,"method":"tools/list"}'
Calling a tool is the same shape with arguments:
curl -X POST https://api.dialnexa.com/v1/mcp \
  -H "Authorization: Bearer YOUR_API_KEY" \
  -H "Content-Type: application/json" \
  -H "Accept: application/json, text/event-stream" \
  -d '{"jsonrpc":"2.0","id":2,"method":"tools/call","params":{"name":"list_agents","arguments":{}}}'
The server is stateless by design: every request authenticates on its own, so there’s no session to establish or keep alive. That makes it friendly to serverless functions and cron jobs, where a persistent connection would be a liability.
The same key works in any MCP client that supports custom headers. In Claude Code, for example, one command registers it:
claude mcp add --transport http dialnexa https://api.dialnexa.com/v1/mcp \
  --header "Authorization: Bearer YOUR_API_KEY"
Two practical notes. Requests are rate limited to 150 per minute per key, generous for automation, and each customer key gets its own bucket, so your traffic never competes with anyone else’s. And the choice between the two auth methods comes down to one question: is there a human present? Assistants with a person behind them should use OAuth, because the access is tied to that person and revocable by them. Unattended code should use an API key, because it’s built for exactly that.
When something doesn’t work
A few situations come up often enough to list.
The connector shows no tools. Usually a stale session. Disconnect and reconnect from the assistant’s settings; the fresh OAuth handshake fixes it.
You’re being asked to log in again. Tokens expire by design and normally refresh silently. If a refresh fails, one more login sets it right. This isn’t a bug; it’s the access model working.
You tested with two Dialnexa accounts in the same browser. Log in as one account per browser profile, or use an incognito window for the second. Mixing accounts in a shared browser session confuses any OAuth flow, not just ours.
A tool call was rejected. Read the error, it’s written to be read. Our server returns specific reasons: an agent that doesn’t belong to your organization, a field that only applies to a different agent type, a file too large for the conversational path. The assistant will usually correct itself from the message alone.
429 errors from a script. You’ve hit the rate limit. Space the requests; the bucket resets every minute.
You’re connected. Now what?
Give it a week of real use. Start with the read-only questions, get a feel for how the assistant handles your data, then let it do heavier lifting once you trust the pattern. In our experience the shift happens quietly: one morning you notice the dashboard tab isn’t open, and you didn’t miss it.
Part 1 covered why we built this. Part 3, coming soon, will be for the engineers: the full technical story of putting an OAuth authorization server and nearly a hundred tools behind one MCP endpoint, including the mistakes we made so you don’t have to. Until then, the MCP docs cover everything the current surface can do.

Leave a Reply